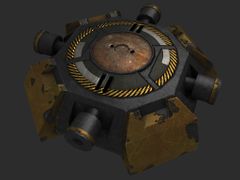
Proximity C4
| Proximity C4 | |
|---|---|
 | |
| Faction | Both |
| Type | Deployable |
| Damage | - (Explosive) |
| Clip | 1/2 |
| Function | Defense |
Proximity C4 is a deployable weapon for the Global Defense Initiative and the Brotherhood of Nod. It is the primary means of base defense.
Appearance
Proximity C4 is a circular/octagonal gray object with yellow diagonal edges, four tubes that makes a plus shape and a black/yellow warning pattern circle in its' inner side. It is usually big enough to be carried with both hands. It glows yellow in the dark, making it visible even with the lack of light.
Function
Proximity C4, or 'Mines/Proxies' as players call it, are a type of anti-personnel mine available to the Hotwire and Technician classes in Renegade X. Mines are primarily used for the defense of each teams' base structures and critical building facilities. Mines are usually deployed at building entrances and choke-points to protect the base and to prevent enemy infantry from easily infiltrating and destroying a building from the inside.
Proximity C4 is limited per-team. Any attempt to place more after the cap is reached will result in oldest mine being removed out from the game. There is an indicator showing the number of deployed mines at any one time at the bottom of the Heads-up Display located in the lower middle of the screen.
A Proximity C4 will detonate when an enemy player comes into close proximity to it. Each mine when detonated deals damage to the enemy unit through a small explosive charge and will also deal a small amount of radial blast damage to any other enemy units caught in the blast radius.
Flak-armored infantries have more resilience against damage dealt from exploding mines.
Proximity C4 anti-infantry mines should not be used to counter enemy tanks or vehicles, instead use the purpose designed Anti-Tank Mines for this task.
Strategy
Usage
Mines are typically deployed in clusters of 3 per doorway, however there a number of exceptions and custom deployment options for unique buildings such as the Nod Airstrip, Hand of Nod and GDI Barracks. On certain flying maps additional access points and ramps are fitted to buildings which provide additional ways to gain access to a structure which must be taken into consideration and mined appropriately. On Advanced Defense Maps, due to presence of Advanced Guard Tower and Obelisk of Light, the most common placement is the tunnel entrances, particularly the one near the Power Plant
Each map will have a specific number of mines available for each team to use in order to protect their buildings, this number is indicated on the lower HUD display in-game.
Due to the limited number of mines available to each team, great care must be taken to mine efficiently and effectively using your available mines to provide maximum protection to buildings without exceeding the limit.
In case of faulty mining, the original miner is able to disarm their own mines using the repair gun. The disarm rate is very fast so you will need to be careful. The target box will indicate the mine's ownership.
Warning: When the mine limit is exceeded, any prior mines that were placed first will disappear and become recycled. Exceeding the mine limit without understanding the consequences may result in leaving buildings exposed to enemy infiltration and attack.
Counters
Enemy proximity mines can be safely disarmed by either directing and firing the repair gun at each mine or by throwing an EMP Grenade that detonates around the mines. The repair gun is available specifically to the Engineer, Hotwire and Technician classes or through the purchase of an individual Repair Tool available in the item purchase menu from team purchase terminals. The advanced engineer class (Hotwire/Technician) will disarm mines considerably quicker than a normal engineer. Likewise a normal engineer will disarm mines faster than the repair tool.
EMP Grenades are to be found within the weapon inventory of specific character including the Laser Chain-gunner, Gunner, Raveshaw and Sydney respectively. Throw your EMP grenade from cover and wait between 5-8 seconds before making a bee-line to the door or be prepared to defend your position until the mines are disarmed. The health indicator of a mine is shown by placing your mouse cursor over the mine when in close proximity.
Another faster but riskier method is to carefully trigger each mine one by one while having an engineer class repair the player absorbing the damage, or sacrifice yourself so others can gain entrance. Keep your distance from the explosions or the mines will damage everyone. This method lacks the subtlety as the enemy team may notice a quick drop in their number of deployed mines and in other instances, the explosion noise will be heard and the familiar "boink" sound indicated to the player who set the mines if it results in a death.
Pro-tip: When disarming mines using either the repair guns or repair tool, first disarm each mines health percentage to 5% and then finally remove all mines remaining health in quick succession. This method maximizes the time available to infiltrate before being discovered. Removing individual mines one by one is likely to alert the enemy before you have time complete the objective.
Whatever method you decide to use, be sure to adapt your tactics accordingly.
Trivia
- This weapon is one of the main team-hampering issues due to mine limit and new players unfamiliar with proper mining placements